Personalized Baby Afghan
Designed by Kim Guzman © May 1998 (rev. 1/99, 6/00)
Please read my Terms of Use
Technique: Regular Crochet
This afghan pattern is the most popular design on my website. It has been made hundreds of times by internet users just like you! Myself, I have crocheted it at least forty times for family and friends.
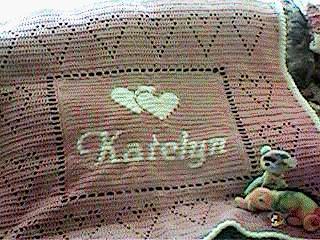
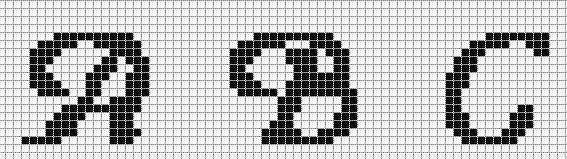
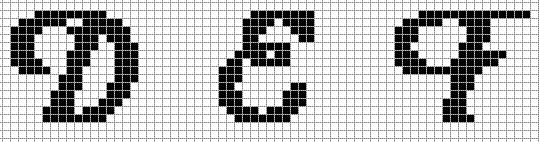
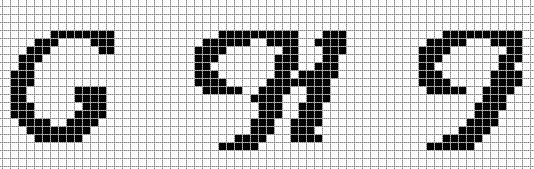
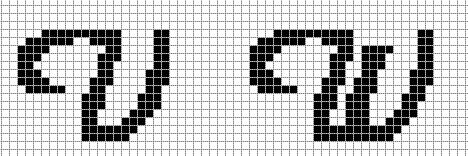
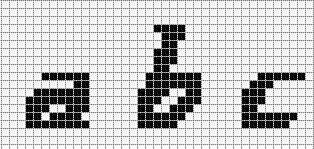
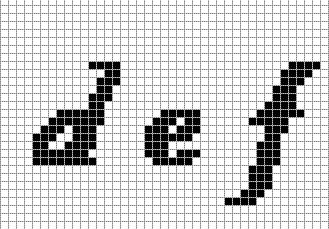
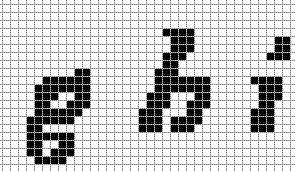
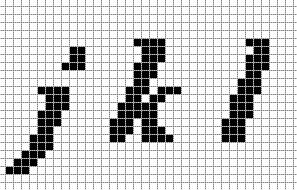
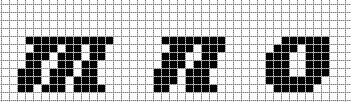
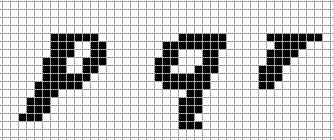
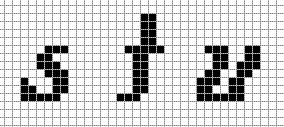
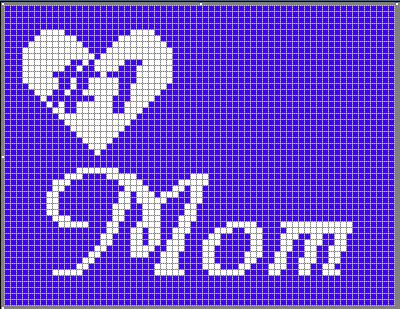
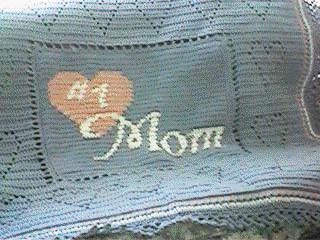
Please note that the afghan shown above is one of the afghans that I personalized. You can personalize your afghan by creating a graph with the complete alphabet set I have designed for this afghan below. Your graph should ALWAYS be 65 stitches by 50 rows.
There was a time when I made the personalized graphs by request. I am no longer able to do this. Not only does my schedule not allow me to do it, I now have Windows 7 (64 bit) and my graphing program does not work on this laptop. I am making my entire folder of graphs I’ve done in the past available to you. Note that not all of them were done for this afghan, so please adjust them as necessary to ensure that you have the correct number of stitches and rows. Click here for the list of graphs. If the name you would like is not listed, you will need to graph it out yourself. Many people use regular graph paper.
I have been told that a couple of the letters in the alphabet are a little off. Please remember that I no longer have the graphing program. I cannot make changes at this time. If would like to make changes to the letters, grab some graph paper and make the changes. Use my letters as a guide. But, I can no longer fix them.
Please read through the entire pattern before beginning. The center personalized portion is all in single crochet and the instructions, although sparse, are at the very bottom of the pattern.
Please download the chart for the outer portion. This will help guide you through the pattern.
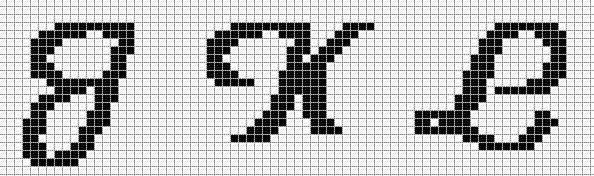
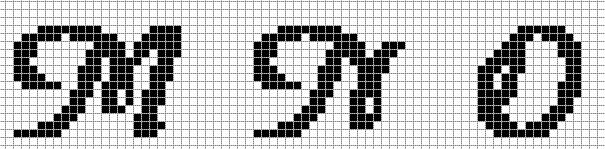
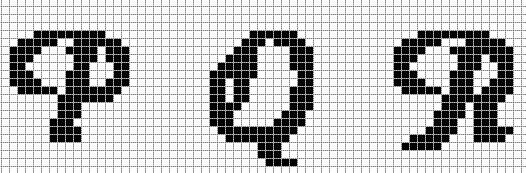
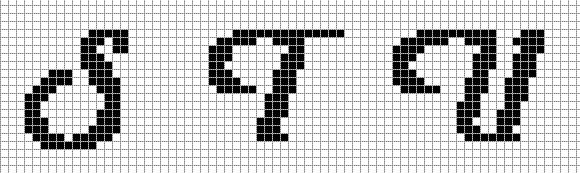
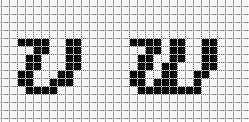
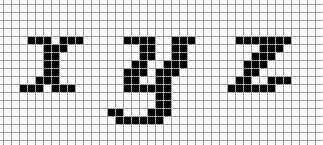
If you would like to see the entire alphabet set on one page, click here.
| Uppercase | Lowercase | Miscellaneous |
Size
Approximately 40″ x 35″
Materials
- Crochet Hooks: H and J(or sizes to obtain gauge)
- 3 skeins (7 oz. each) Red Heart Supersaver in Main Color
- 1 skein (7 oz.) Red Heart Supersaver in Contrasting Color
- Yarn needle (for weaving ends)
Gauge
13 dc = 4 in., 7 rows dc = 4 in., 14 sc = 4 in., 16 rows sc = 4 in.
Personalized Graph
Please choose from one of the following graphs (or make your own):
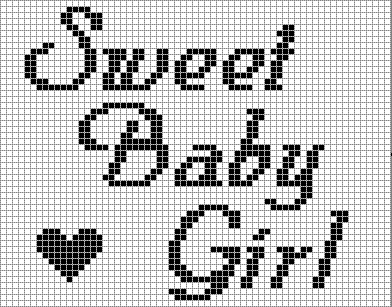
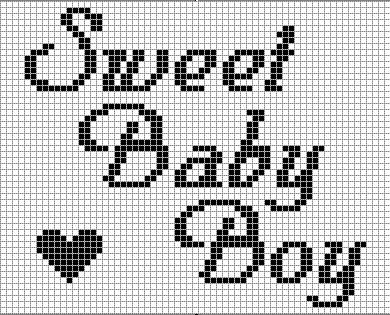
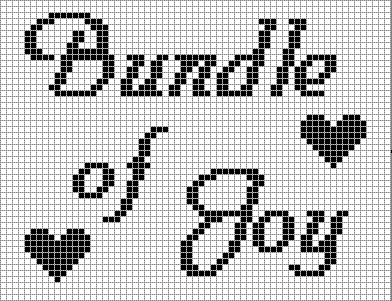
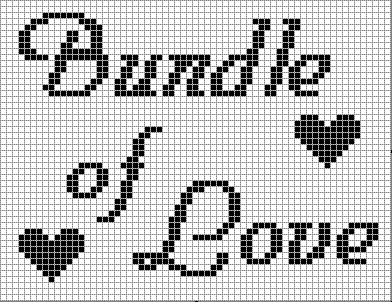
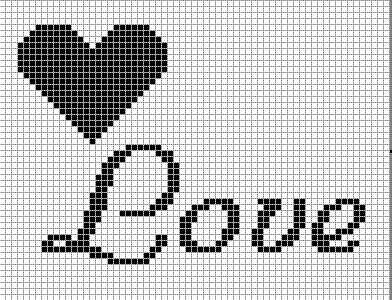
| Sweet Baby Girl Sweet Baby Boy Bundle of Joy Bundle of Love Love #1 Mom |
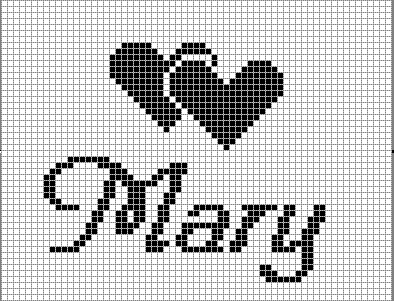
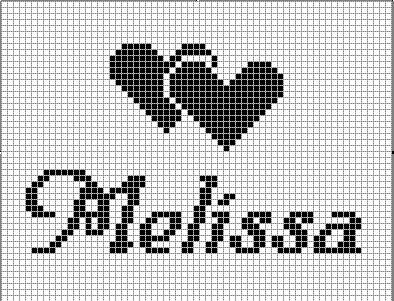
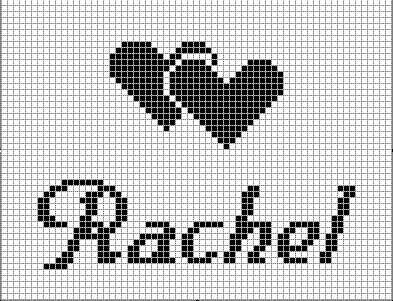
Brianna Emily Katelyn Mary Melissa Rachel Sarah |
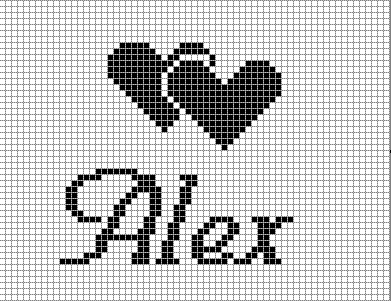
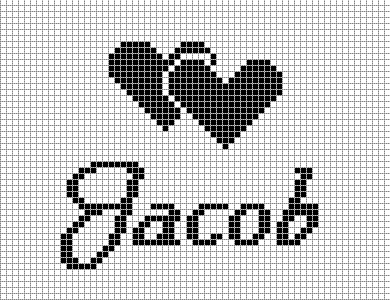
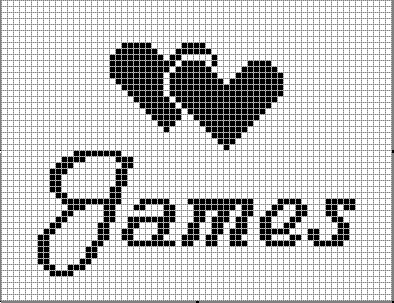
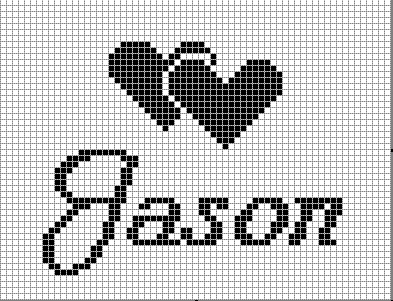
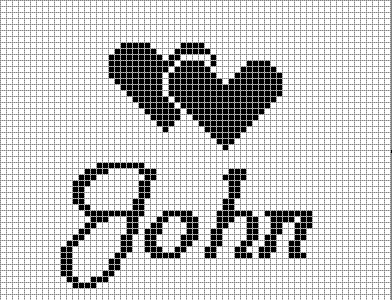
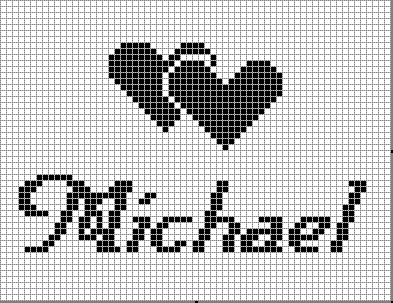
Alex Andrew Jacob James Jason John Michael |
Instructions
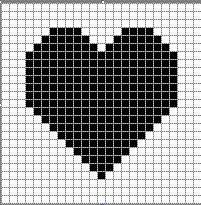
This afghan is comprised of a personalized mat (worked from one of the graphs above), a heart border and an outside edging/border. Instructions are written separately for each. You can start with either the personalized mat or the heart border. Although the instructions are quite lengthy, once you start to see the pattern develop in the heart border, it will not seem nearly as intimidating. This link will take you to a graph of an individual heart which will enable you to see how each heart should look. You may want to make the hearts based on the graph instead of the written instructions, or a combination of both. Enjoy!
Note When counting double crochets, remember to count the turning 3-ch as one double crochet. Also, please note that I personally prefer to use a ch-2 as my turning chain rather than the ch-3 shown in this pattern since I crochet rather loosely. Please feel free to use the ch-2 if it works better for you as well.
New! Below is a graph of the heart border of this afghan. This should really help in crocheting this portion since the written instructions can get confusing due the length of the instructions.

Row 1: With Main Color and H hook (Note: H hook is used throughout until Row 2 of the Edging/Border), chain 126. In fourth ch from hook, dc. Dc across. (124 dc) Attach a small piece of a contrasting color yarn to mark this side as the RIGHT side. Ch 3, turn.
Rows 2 – 4: Work dc across. (124 dc) Remember to count the turning ch as a dc. Ch 3, turn.
Row 5: Work 13 dc. * Ch 1, sk next stitch, work 18 dc. Repeat from * 4 more times. Ch 1, sk next stitch, work 14 dc. (6 ch-1 sps) Ch 3, turn.
Row 6: Work 12 dc. * Ch 1, sk next stitch, dc in ch-1 sp, ch 1, sk next stitch, work 16 dc. Repeat from * 4 more times. Ch 1, sk next stitch, dc in ch-1 sp, ch 1, sk next stitch, work 13 dc. (12 ch-1 sps) Ch 3, turn.
Row 7: Work 11 dc. * Ch 1, sk next stitch, dc in ch-1 sp, in next stitch and in second ch-1 sp, ch 1, sk next stitch, work 14 dc. Repeat from * 4 more times. Ch 1, sk next stitch, dc in ch-1 sp, in next stitch and in second ch-1 sp, ch 1, sk next stitch, work 12 dc. Ch 3, turn.
Row 8: Work 10 dc. * Ch 1, sk next stitch, dc in ch-1 sp, in next three stitches and in second ch-1 sp, ch 1, sk next stitch, work 12 dc. Repeat from * 4 more times. Ch 1, sk next stitch, dc in ch-1 sp, in next three stitches and in second ch-1 sp, ch 1, sk next stitch, work 11 dc. Ch 3, turn.
Row 9: Work 9 dc. * Ch 1, sk next stitch, dc in ch-1 sp, in next 5 dc and in second ch-1 sp, ch 1, sk next stitch, work 10 dc. Repeat from * 4 more times. Ch 1, sk next stitch, dc in ch-1 sp, in next 5 dc and in second ch-1 sp, ch 1, sk next stitch, work 10 dc. Ch 3, turn.
Row 10: Work 8 dc. * Ch 1, sk next stitch, dc in ch-1 sp, in next 7 dc and in second ch-1 sp, ch 1, sk next stitch, work 8 dc. Repeat from * 4 more times. Ch 1, sk next stitch, dc in ch-1 sp, in next 7 dc and in ch-1 sp, ch 1, sk next stitch, work 9 dc. Ch 3, turn.
Row 11: Work 7 dc. * Ch 1, sk next stitch, dc in ch-1 sp, in next 9 dc and in second ch-1 sp, ch 1, sk next stitch, work 6 dc. Repeat from * 4 more times. Ch 1, sk next stitch, dc in ch-1 sp, in next 9 dc and in second ch-1 sp, ch 1, sk next stitch, work 8 dc. Ch 3, turn.
Row 12: Work 6 dc. * Ch 1, sk next stitch, dc in ch-1 sp and in next 5 dc. Ch 1, sk next stitch, dc in next 5 dc and in next ch-1 sp. Ch 1, sk next stitch, work 4 dc. Repeat from * 4 more times. Ch 1, sk next stitch, dc in ch-1 sp and in next 5 dc. Ch 1, sk next stitch, dc in next 5 dc and in next ch-1 sp. Ch 1, sk next stitch, work 7 dc. (18 ch-1 sps) Ch 3, turn.
Row 13: Work 6 dc. * Work dc in ch-1 sp, ch 1, sk next stitch, dc in next 4 dc, ch 1, sk 1 stitch, dc in ch-1 sp, ch 1, sk 1 stitch, dc in next 4 dc, ch 1, sk 1 stitch, dc in ch-1 sp and in next 4 dc. Repeat from * 5 more times. Dc in each of last 3 dc. (24 ch-1 sps) Ch 3, turn.
Row 14: Work 7 dc. * Work dc in ch-1 sp, ch 1, sk next stitch, dc, ch 1, sk next stitch, dc in each of dc, ch-1 space, next dc, ch-1 sp and next dc, ch 1, sk next stitch, dc, ch 1, sk next stitch, dc in ch-1 sp and in next 6 dc. Repeat from * 5 more times. Dc in each of last 2 dc. (24 ch-1 sps) Ch 3, turn.
Row 15: Work dc in each dc and ch-1 sp across. (124 dc) Ch 3, turn.
Row 16: Work dc in each dc across. (124 dc) Ch 3, turn.
Row 17: Work 25 dc across. (Ch 2, skip 2 stitches, dc) 24 times. Work 26 more dc across to end. (24 open mesh spaces) Ch 3, turn. DO NOT CUT.
This completes the lower portion. You will now begin working one side, then the other (separately).
Row 18: Work 26 dc. Ch 2. Skip open mesh, dc in dc. Ch 5, turn.
Row 19: Skip open mesh, work 12 dc, ch 1, sk 1 stitch, 14 dc. Ch 3, turn.
Row 20: Work 12 dc, ch 1, sk 1 stitch, dc in ch-1 sp, ch 1, sk 1 stitch, 11 dc, ch 2, dc in third ch of turning 5-ch lp. Ch 5, turn.
Row 21: Skip open mesh, work 10 dc, ch 1, sk 1 stitch, dc in ch-1 sp, dc and in next ch-1 sp, ch 1, sk 1 stitch, 12 dc. Ch 3, turn.
Row 22: Work 10 dc, ch 1, sk 1 stitch, dc in each of ch-1 sp, 3 dc and next ch-1 sp, ch 1, sk 1 stitch, 9 dc, ch 2, dc in third ch of turning 5-ch lp. Ch 5, turn.
Row 23: Skip open mesh, work 8 dc, ch 1, sk 1 stitch, dc in each of ch-1 sp, 5 dc and next ch-1 sp, ch 1, sk next stitch, 10 dc. Ch 3, turn.
Row 24: Work 8 dc, ch 1, sk 1 stitch, dc in each of ch-1 sp, 7 dc and next ch-1 sp, ch 1, sk 1 stitch, 7 dc, ch 2, dc in third ch of turning 5-ch lp. Ch 5, turn.
Row 25: Skip open mesh, work 6 dc, ch 1, sk 1 stitch, dc in each of ch-1 sp, 9 dc, and next ch-1 sp, ch 1, sk 1 stitch, 8 dc. Ch 3, turn.
Row 26: Work 6 dc, ch 1, sk 1 stitch, dc in ch-1 sp and each of next 5 dc. Ch 1, sk 1 stitch, dc in each of next 5 dc and ch-1 sp, ch 1, sk 1 stitch, 5 dc, ch 2, dc in third ch of turning 5-ch lp. Ch 5, turn.
strong>Row 27: Skip open mesh, work dc in each of 5 dc and ch-1 sp, ch 1, sk 1 stitch, 4 dc, ch 1, sk 1 stitch, dc in ch-1 sp, ch 1, sk 1 stitch, 4 dc, ch 1, sk 1 stitch, dc in ch-1 sp and in each of 7 dc. Ch 3, turn.
Row 28: Work dc in each of 8 dc and ch-1 sp, ch 1, sk 1 stitch, dc, ch 1, sk 1 stitch, dc in each of dc, ch-1 sp, dc, ch-1 sp, dc. Ch 1, sk 1 stitch, dc, ch 1, sk 1 stitch, dc in each of ch-1 sp and 6 dc. Ch 2, dc in third ch of turning 5-ch lp. Ch 5, turn.
Row 29: Skip open mesh, work dc in each stitch across, including ch-1 sps. (27 dc)
Row 30: Work 26 dc, ch 2, dc in third ch of turning 5-ch lp. Ch 5, turn.
Row 31: Work 27 dc across. Ch 3, turn.
Row 32: Repeat Row 30.
Rows 33 – 42 Repeat Rows 19 through 28.
CUT yarn and fasten off.
For completion of opposite side of heart border, with WRONG side facing you, counting from the left, sk turning ch-3, sk 25 dc, sk 2 ch. Attach yarn to the next dc. Ch 5.
Row 18: Skip open mesh. Work dc across. (26 dc) Ch 3, turn.
Row 19: 13 dc, ch 1, sk 1 stitch, 11 dc, ch 2, sk open mesh, dc in third ch of ch-5 turning lp. Ch 5, turn.
Row 20: Skip open mesh. Work 10 dc, ch 1, sk 1 stitch, dc in ch-1 sp, ch 1, sk 1 stitch, 13 dc. Ch 3, turn.
Row 21: Work 11 dc, ch 1, sk 1 stitch. Work dc in each of ch-1 sp, dc and ch-1 sp. Ch 1, sk 1 stitch, 9 dc. Ch 2, skip open mesh, dc in third ch of ch-5 turning lp. Ch 5, turn.
Row 22: Skip open mesh. Work 8 dc, ch 1, sk 1 stitch. Dc in each of ch-1 sp, 3 dc and next ch-1 sp. Ch 1, sk 1 stitch, 11 dc. Ch 3, turn.
Row 23: Work 9 dc, ch 1, sk 1 stitch. Work dc in each of ch-1 sp, 5 dc and next ch-1 sp. Ch 1, sk 1 stitch, 7 dc. Ch 2, skip open mesh, dc in third ch of ch-5 turning lp. Ch 5, turn.
Row 24: Skip open mesh. Work 6 dc, ch 1, sk 1 stitch. Dc in each of ch-1 sp, 7 dc and next ch-1 sp. Ch 1, sk 1 stitch, 9 dc. Ch 3, turn.
Row 25: Work 7 dc, ch 1, sk 1 stitch. Dc in each of ch-1 sp, 9 dc and next ch-1 sp. Ch 1, sk stitch, 5 dc. Ch 2, dc in third ch of turning ch-5 lp. Ch 5, turn.
Row 26: Skip open mesh, work 4 dc, ch 1, sk 1 stitch, dc in ch-1 sp and each of next 5 dc. Ch 1, sk 1 stitch, dc in each of next 5 dc and ch-1 sp, ch 1, sk 1 stitch, 7 dc. Ch 3, turn.
Row 27: Work dc in each of 6 dc and ch-1 sp, ch 1, sk 1 stitch, 4 dc, ch 1, sk 1 stitch, dc in ch-1 sp, ch 1, sk 1 stitch, 4 dc, ch 1, sk 1 stitch, dc in ch-1 sp and in each of 4 dc. Ch 2, skip open mesh, dc in third ch of turning ch-5 lp. Ch 5, turn.
Row 28: Skip open mesh, work dc in each of 5 dc and ch-1 sp. Ch 1, sk 1 stitch, dc, ch 1, sk 1 stitch, dc in each of dc, ch-1 sp, dc, ch-1 sp, dc. Ch 1, sk 1 stitch, dc, ch 1, sk 1 stitch, dc in each of ch-1 sp and 8 dc. Ch 3, turn.
Row 29: Work dc in each stitch across, including ch-1 sps. Ch 2, dc in third ch of turning ch-5 lp. Ch 5, turn.
Row 30: Skip open mesh, work dc across. (26 dc) Ch 3, turn.
Row 31: Work 25 dc across, ch 2, dc in third ch of turning ch-5 lp. Ch 5, turn.
Row 32: Repeat Row 30.
Rows 33 – 43: Repeat Rows 19 through 29, except on Row 29, do not do the ch-5 turning ch to turn. Continue with the following. Ch 65. Being careful not to twist the chain or the border, dc in the top of the last dc of the first side of the heart border, which you’ve already worked. Ch 2, sk 2 ch and dc across. Ch 3, turn. (27 dc for this side)
Row 44: Ch 3. Work 26 dc. Work 24 dc open mesh spaces evenly across chains. Work 26 dc to the end. Ch 3, turn.
Row 45: Work dc in each stitch across, including all ch-2 sps and dc. Including the turning ch-3, you will have 124 dc total.
Rows 46 – 58: Repeat Rows 4 through 16.
Row 59: Work dc across. Ch 3, turn.
Row 60: Work dc across. Ch 1. DO NOT CUT.
With RIGHT side facing, sc evenly around the entire piece, with 3 sc in each corner. CUT and fasten off.
Note: You have now completed the heart border “frame.” To make a nice even border around the inside for easy attaching of the personalized mat, work the following.
Attach yarn to the RIGHT side in any stitch on the INSIDE of the heart border frame. Single crochet evenly around, skipping stitches in the corners where necessary to accommodate the curves.
CUT yarn and fasten off.
Personalized Mat
Count the number of blocks across the width of your chosen graph to ensure 65 stitches by 50 rows (one or two stitches or rows off won’t matter a whole lot). Use that number, plus one, as your beginning chain. Work according to the personalized graph in SINGLE CROCHET. Use bobbins where necessary for yarn not in use. Do not carry colors for more than 5 or 6 stitches. Once completed, sc evenly around the entire mat with the RIGHT side facing you.
Attach mat to sides and bottom of heart border by whipstitching together.
Edging/Border
Note: This border is perfect for either a girl or a boy. It makes a sort of “twisted rope” border. If you would like a fancier, more feminine border, try the border design here. To see a photo of this afghan with the fancier border design, click here.
Row 1: Attach Contrasting Color to any center sc of corner on RIGHT side. Ch 1. Sc around entire afghan. Sl st to the first sc. CUT OFF.
Row 2: With two strands of Contrasting Color held together at the same time and J hook, attach Contrasting Color yarn to any sc on the outside of the afghan. * Ch 1. Sk 1 sc, Rev Hdc in next sc. Rep from * around, ending with ch 1. Sl st to beg ch. Fasten off and weave in all ends. (Note: You do not need to use two separate skeins of yarn for this portion. Just pull about half of the skein of yarn out from the skein, then you will have two separate skeins.)