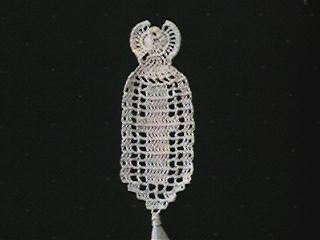
Angel Bookmark
designed by Kim Guzman © Apr. 1999
Please read my Terms of Use
Technique: Regular Crochet
Size
2-1/4 inches at its widest point. Almost 8 inches long, after adding tassel.
Materials
Crochet Hook size 7, 1 small ball bedspread weight cotton (size 10), 1-inch piece of cardboard
Tunisian Crochet Pattern Instructions
Row 1: Ch 4. Sl st to form circle. Ch 2. Work 10 hdc in circle. Join with sl st to second ch of ch 2.
Row 2: Ch 1. Sc in same stitch and in next two stitches. Ch 3, turn.
Row 3: Work 8 dc in same stitch. Ch 2. Work 3 tr in next sc. Ch 2. Work 9 dc in last sc. Ch 4, turn.
Row 4: Sk first dc. * Dc in next dc, ch 1. Repeat from * 6 more times. Dc in next dc. Ch 2. Work 2 tr in each of next 3 tr. Ch 2. ** Dc in next dc, ch 1. Repeat from ** 7 more times. Dc in last st. Ch 1, turn.
Row 5: (right side) Sc in same st. * Sc in ch-1 sp and in next dc. Repeat from * 7 more times. Work 2 sc in ch-2 sp. Sl st in next tr. Ch 4. Work 2 tr in same st. Work 2 tr in each of next 5 tr. Ch 4. Sl st in the same tr as last 2 tr. Work 2 sc in ch-2 sp. ** Sc in dc and in ch-1 sp. Repeat from ** 7 more times. Sc in third ch of turning ch. Fasten off.
Note: You can stop here and attach a pin back to the angel for a nice lapel pin.
Attach thread to right side of angel in the bottom right corner of her dress by attaching to the fourth ch of the bottom tr row.
Row 6: Ch 3. Work 2 dc in same st. * Ch 2, sk 1 st, dc in next st. Repeat from * 5 more times. 2 dc in last stitch. Ch 3, turn.
Row 7: Sk first dc. Dc in each of next two dc. Ch 2, sk 2 stitches, dc in next stitch. Ch 2, sk 2 stitches. Work dc in each of next 7 stitches. Ch 2, sk 2 stitches, work dc in next stitch. Ch 2, sk 2 stitches, work dc in each of next 3 stitches. Ch 3, turn.
Rows 8-11: Repeat Row 7.
Row 12: Sk first dc. Dc in each of next two dc. Ch 2, sk 2 stitches. Work dc in each of next 13 stitches. Ch 2, sk 2 stitches. Dc in each of next 3 stitches. Ch 3, turn.
Row 13: Repeat Row 12.
Rows 14-19: Repeat Row 7, except on Row 19, do not ch 3 before turning.
Row 20: Sl st to third dc. Ch 3. Work 2 dc in ch-2 sp. Dc in next dc. * Ch 2, sk 2 stitches, dc in next stitch. Repeat from * 3 more times. Work 2 dc in ch-2 sp and dc in next dc. Turn. (Do not chain first.)
Row 21: Sl st to fourth dc. Ch 3. Work 2 dc in ch-2 sp. Dc in next dc. (Ch 2, sk 2 stitches, dc in next dc) twice. Work 2 dc in ch-2 sp and dc in next dc. Turn. (Do not chain first.)
Row 22: Sl st to fourth dc. Ch 3. Work 2 dc in ch-2 sp. Dc in next dc. Work 2 dc in ch-2 sp and dc in next dc. Turn. (Do not chain first.)
Row 23: Sl st to second dc. Ch 4. Sk 2 dc. Sl st in next dc and in each dc to end. Fasten off.
Tassel
Cut a 1-inch piece of cardboard and wind thread around 15-18 times. Cut off 6-inch piece of thread for top tie of tassel. Remove wound thread from cardboard and tie the 6-inch piece to the top tightly. Cut the wound thread at the other end. Cut another 6-inch piece of thread and wind around the top of the tassel approximately 1/4 inch from the top tie. Trim the ends evenly and attach to the loop at the bottom of the bookmark. Weave in all ends.